FAQ

Here you’ll find questions and answers for educators using the My Music Bridge desktop app, students using our mobile app, and other questions relating to My Music Bridge! If you have any questions you don’t find answered here, send an email to mmbsupport@musbridge.com and we’ll reach out ASAP.

Thanks so much for choosing My Music Bridge to help you take the pain out of practice!

My Music Bridge Meet Moe

For Students

  • Just click this link for iPhone and this link for Android with the device you’d like to use for My Music Bridge, and download the app from there. Happy practicing!
  • A super important part of beta testing is the feedback we receive from you all on how to make the app better! Please report bugs when you find them and send us screenshots of problems when it’s relevant.”, with “Thank you so much for your feedback! Your feedback on your experience is the number one way we improve the app. Please report bugs when you find them and send us screenshots of problems when it’s relevant.
  • If you’re planning on attaching a screenshot or screen recording, make sure you have it before you navigate to the feedback screen.
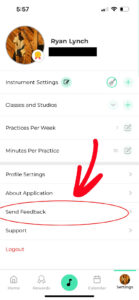
  • In the My Music Bridge student app, navigate to the settings tab.
  • Select the send feedback button.
    MMB FAQ Sending Feedback
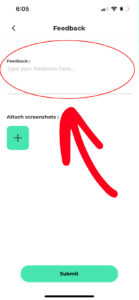
  • This will take you to the feedback screen.
    MMB FAQ Sending Feedback
  • In the text box, describe the bug you found, problem you experienced, or suggestion you have for the My Music Bridge team to take a look at.
    MMB FAQ Sending Feedback 
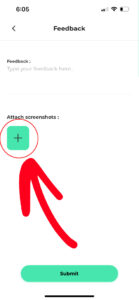
  • If you’d like to include a screenshot or screen recording of your problem, click the plus to pull up your camera roll and attach the image.
  • Click submit, and you’ll have submitted your feedback! Thanks so much for your input, it’ll help us a lot!
  • Open the app
  • Select which login option best suits your needs, Facebook, Apple, Google, Email
  • Set up your username, password, mobile phone number, and email if needed 
  • Connect with your teacher and enroll in their class by entering their class code 
  • Set how many times you’d like to practice per week, and for how long 
  • Schedule your first practice session to learn how our reminder system works 
  • You’re all set! Have fun practicing with My Music Bridge
  • Hit the home button on the tool bar at the bottom of the screen 
  • Once there, hit the big green button on that same tool bar 
  • If it’s your first practice session, hit play on the big green button to get going
  • Get practicing!

MMB FAQ Starting a Practice Session

  • Hit the calendar button on the tool bar at the bottom of the screen 


MMB FAQ Scheduling a Session


  • Once there, hit the big green plus button on that same tool bar


MMB FAQ Adding an Event


  • Select whether you’re scheduling a lesson, a class, or a practice session
  • Give your event a name 


MMB FAQ Naming an Event


  • Pick the appropriate date, start, and end time 
  • Let us know if you want to repeat the event so you get continuous reminders 
  • And set up how often/when you would like them! 


MMB FAQ Setting the Frequency of an event


  • You’re all set! My Music Bridge will remind you when it’s time to practice
  • Hit the settings button on the tool bar at the bottom of the screen


MMB FAQ Earning a Badge


  • Once there, head to your instrument settings to review how often you expect yourself to practice each week, and for how long each practice


MMB FAQ Earning a Badge


  • Once you know what your expectations are, head to the home page by leaving the settings page and hitting the home button on the tool bar at the bottom of the screen.


MMB FAQ Earning a Badge


  • After you make it back to the home page, start up a practice session!
  • Make sure you practice as long as your expectations are set for, and you’ll earn your day badge!
  • Practice as often as your expectations are set for, and you’ll earn your week badge!
  • Good luck and have fun practicing with My Music Bridge!
  • Make sure you’re on the home page by hitting the home button on the toolbar at the bottom of your screen.


MMB FAQ Viewing Goals and Media


  • Once you’re there, hit the name on the “Goals” block on your home page.


MMB FAQ Viewing Goals and Media


  • Here you’ll find all the goals given to you by your teacher, and all of the media attached to them!


MMB FAQ Viewing Goals and Media

  • Start up a practice session by hitting the big green button on the toolbar at the bottom of your screen while you’re on the home page.
  • While in your practice session, click or swipe up on the bar on the bottom of your screen to pull up the goals and media tab.


MMB FAQ Viewing Goals and Media During a Practice Session


  • Here you’ll find all the goals given to you by your teacher, and all of the media attached to them!
  • Start up a practice session by hitting the big green button on the toolbar at the bottom of your screen while you’re on the home page
  • Make sure you start your recorder
  • Once you finish your practice, your recording will be at the bottom of the feedback screen
  • Click the icon and your share options will appear
  • Pick whichever works best for you and your teacher, and get that session over to them!
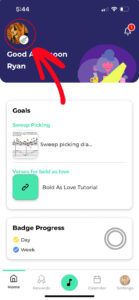
  • Navigate to the home page.
  • Click your profile picture on the home page.
    MMB FAQ Adding an Instrument
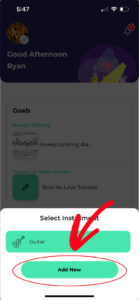
  • This will bring you to instrument selection screen.
  • Hit the add new button.
    MMB FAQ Adding an Instrument
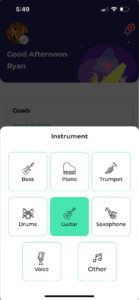
  • Select which instrument you would like to add to your My Music Bridge account.
    MMB FAQ Adding an Instrument
    • If you selected other, enter the name of the instrument you’d like to add.
  • Follow the onboarding process.
    • Enter a class code if applicable.
    • Set up your practices per week, and time per practice.
    • Schedule your first practice session if you want.
    • You’re now logged into your new instrument profile!
  • Open the app to the log in screen
  • Select the reset your password link

MMB FAQ Resetting Your Password

  • We’re sorry to see you go! Follow these steps to delete your account.
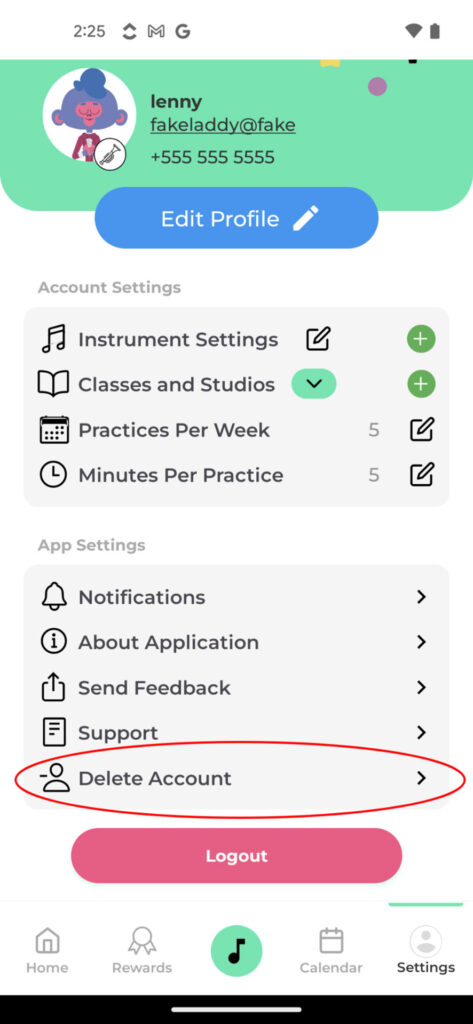
  • Navigate to the settings page and select the “Delete Account” button

    My Music Bridge FAQ Deleting Account

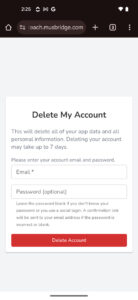
  • From there, you’ll be directed to the My Music Bridge website to input your account information. Fill out the form and select the “Delete Account” button. After doing so, you’ll be sent a confirmation email to the email associated with your account

    My Music Bridge FAQ Deleting Account


  • Upon receiving the email, select “Confirm Account Deletion”, and your account has been deleted.

My Music Bridge FAQ Deleting Account

For Teachers

  • Go to the My Music Bridge teacher website 
  • Select which log in option works best for you
    • Continue with google: log into your google account and you’re all set to go! 
    • Sign up with email: input your first and last name, email, phone number, and create your password. Now you’re all set to go!
  • Sign in to your My Music Bridge educator account.
  • Make your way to the home page.


MMB FAQ Creating a Class


  • Select the new class button.
    • This option is for large classes such as public/private school choirs, orchestras, or bands. For private lesson management create a studio instead.
  • Input the name of your class and school.
  • Input your practice expectations for the class
    • These will be the default practice settings for any student that enrolls in your class.
  • Toggle the chat function as you prefer, and open enrollment.


MMB FAQ Creating a Class


  • Click “Create”.
  • Your class is now ready to go!
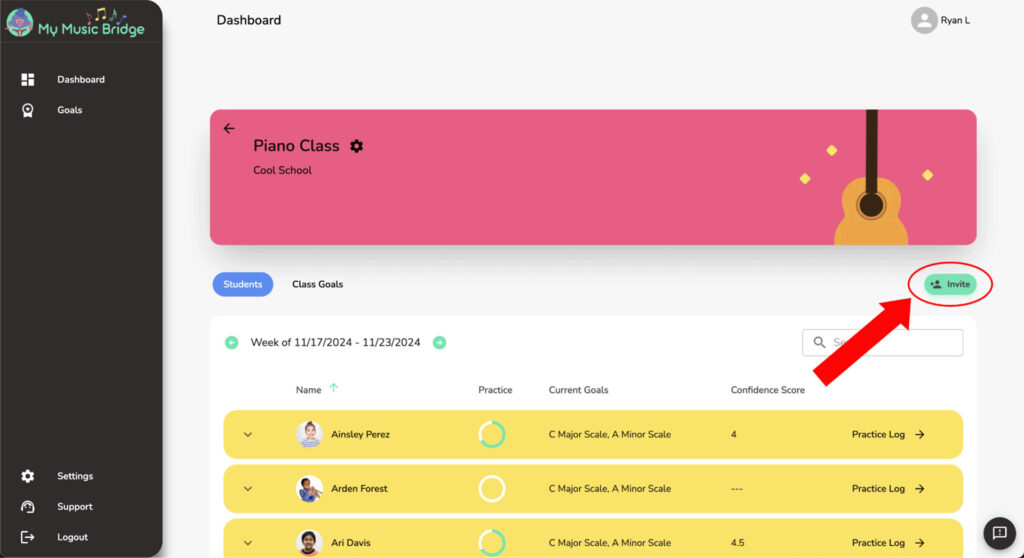
  • Inviting your students is super simple! You can invite your students to your studio or class via your unique code found in the upper right corner of your class screen.
    My Music Bridge FAQ How Do I Invite My Students to My Class

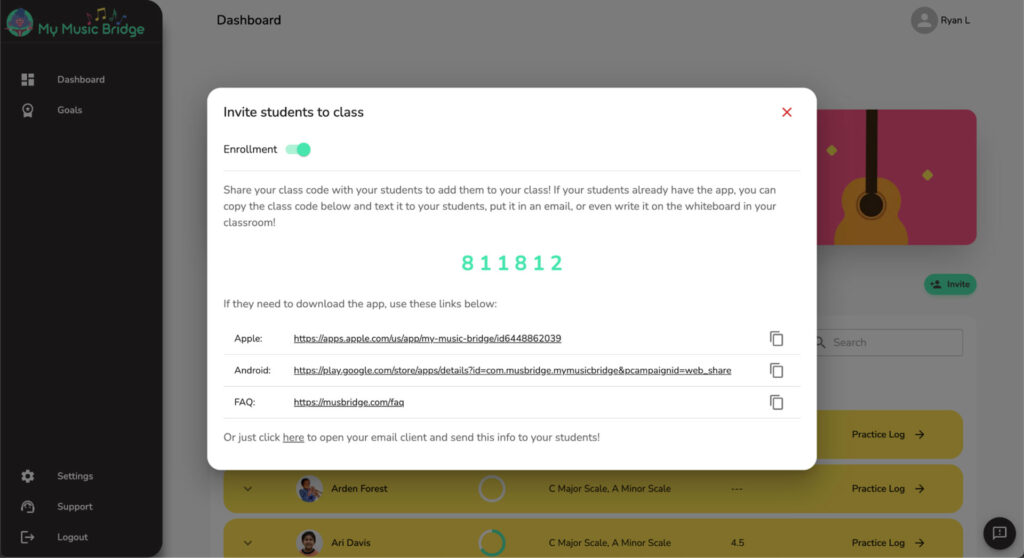
  • Click this button and you’ll pull up the class invitation. That will look like this.
    My Music Bridge FAQ How Do I Invite My Students to My Class

  • You can copy and paste your class code and invite students via email, text, or even just putting the code on a whiteboard in your classroom! All you have to do is get the code to your students, and they can do the rest!
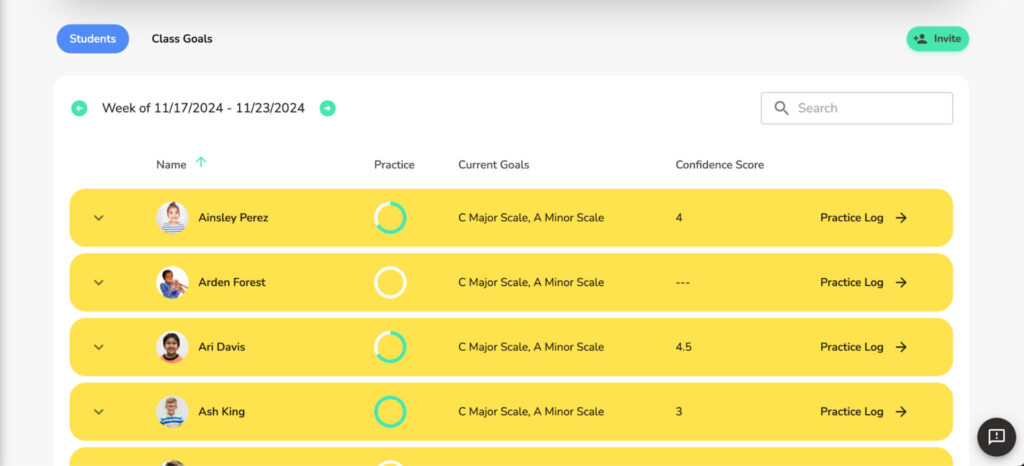
  • Once added, you’ll see your students appear in the class roster. It will look something like this.
    My Music Bridge FAQ How Do I Invite My Students to My Class

  • Your students are now enrolled in your class!
  • From the home page select a class or studio.
  • This is the class overview page, from here you can see the students enrolled in the class, the goals attached to the class, and can manage all aspects of the class as it relates to My Music Bridge.
  • Make your way to the goal page on the My Music Bridge teacher site.

My Music Bridge FAQ Creating Goals

  • On the first line of the goal page, enter the goal title, description, and add any media you would like.
  • Once those fields are filled, select the add goal button.

My Music Bridge FAQ Creating Goals

  • That goal has now been created and added to the My Music Bridge system.
  • You can also create a goal inside the class/studio screen, and it will automatically attach to the class it is created in.
    • This goal will still be added to the My Music Bridge system to add to other classes as desired.


  • Make your way to the goal page on the My Music Bridge teacher site.


MMB FAQ Attaching Goals


  • Select the goals you would like to assign to a class or studio.


MMB FAQ Attaching Goals


  • Hit the “Add to” button in the corner.
  • Select class or studio.


MMB FAQ Attaching Goals


  • Select the class or the studio you want to assign the selected goals to.


MMB FAQ Attaching Goals


  • Those goals are now attached to the class or studio.
  • Make your way to the class overview page.
  • From there, navigate to the class goal screen.


MMB FAQ Assigning Goals


  • Select the assign toggle on the goal screen.


MMB FAQ Assigning Goals


  • The goal is now assigned to your students in the class, and it will appear for them on their app.
  • Make your way to the studio overview page.
  • From there, select the student you want to assign the goal to.
  • Select add goal.
  • Select from the goals currently attached to this studio.
  • The goal is now assigned to your students in the class, and it will appear for them on their app.
  • Make your way to the class overview page.
  • From there, navigate to the class goal screen.
  • From the assigned goals, select which you would like to approve.
  • Confirm the approval.
  • Students will now get credit for achieving that goal, will be rewarded on their app, and the goal will be removed from what they need to work on.
  • Make your way to the studio overview page.
  • From there, select the student who you’d like to approve the goal for.
  • Select the approve button.
  • Confirm the approval.
  • Student will now get credit for achieving that goal, will be rewarded on their app, and the goal will be removed from what they need to work on.
  • Navigate to the class/studio overview page.
  • Move ot the goals tab.
  • Select the click to add media button that is inline with the goal.


MMB FAQ Attaching Media


  • Paste a link if desired to add a link to the goal.
  • Drag and drop or browse on your device to attach a file.
  • Select the pencil to change the name of the file.


MMB FAQ Attaching Media


  • Select done.
  • Media is now added to the goal.
  • Select the media on the class goals page


MMB FAQ Managing Goal Media


  • Select the pencil to edit the name of the files
  • Select remove to delete the media from the goal
  • Classes are tailored to support larger classroom settings. Think public/private school choirs. bands, and orchestras. They allow teachers to manage and track large groups of students while still being able to track individual progress at the student level
  • Studios are tailored to support the private lesson setting. One on one lessons, some small ensembles, those types of environments. They help teachers create individualized lesson plans for their students and make sure they stay on track, while allowing them to organize their resources for instruction.